Moving from Moustra
Bring your Moustra animal records
Export the animal grid to Excel, keep IDs and physical tags separate, and check cages, genotypes and sire links before saving.
Before you start
- Start with a list of living animals. This format does not match a status column automatically; for historical records, include a status column, map it to Status and check every outcome before saving.
- Show EID if you want to use Moustra's lab-scoped numbers as animal IDs. EID is not a microchip number.
- Keep the original export and use a blank practice lab to try the fictional sample.
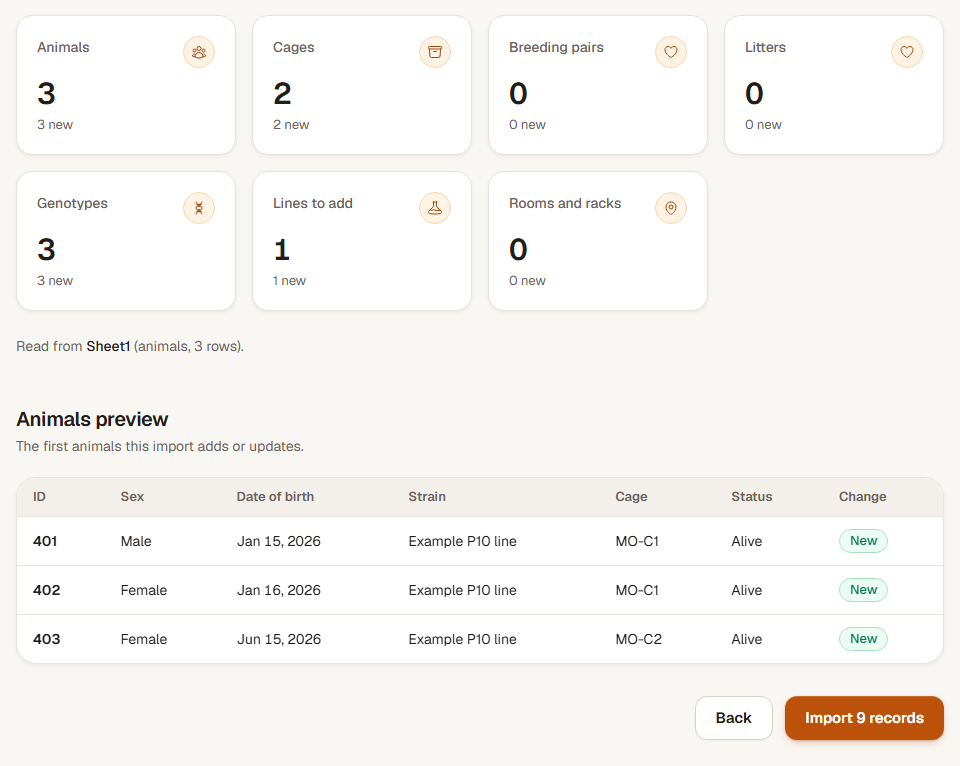
A fictional animal list: 3 animal records, 2 cages, 1 line and 3 genotype results. In an empty lab, the preview offers Import 9 records. All 3 animals are alive.
Step 1: Filter the animal grid and choose columns
Open Animals in Moustra. Set the filters for the animals you want to move, then use Columns to show EID, Physical Tag, Sex, Date of Birth, Cage Tag, Strain, Genotypes and Sire.
Choose Export. Moustra downloads an Excel file containing the filtered rows and visible columns. Check its row count against the grid. You can upload the Excel file directly; a CSV saved from it also works.
Step 2: Upload and check IDs and physical tags
Open Import in ConductColony and upload the file. Look for Moustra animal list recognized, then check the matches before continuing.
EID becomes Animal ID and Physical Tag becomes Ear tag. If EID is absent, Physical Tag becomes Animal ID. Keep the same choice for later updates. Cage Tag is the cage number, and Genotypes contains the named gene results.
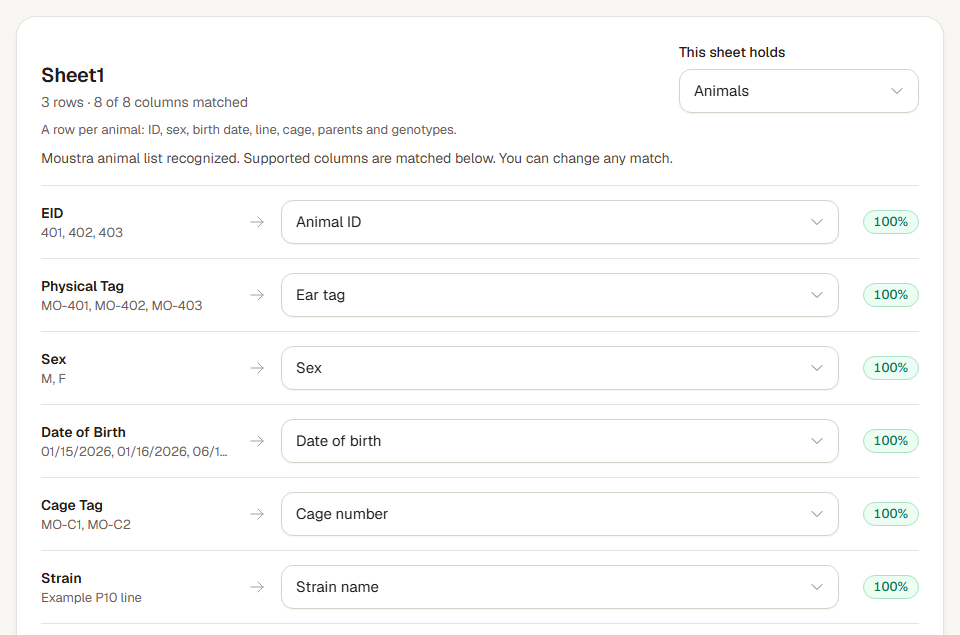
Recognized columns are matched for you. Check each match and change any field that needs a different meaning. Step 3: Review the preview
Choose Next: options and then Check and preview. Check dates, status, cage numbers and genotype results. A Sire value can match an animal's ID or a unique ear tag in the file or your lab; read any missing-parent warning.
The sample should offer Import 9 records. It contains animal IDs 401, 402 and 403 with physical tags MO-401, MO-402 and MO-403. All three are alive.
Step 4: Save and compare the records
Choose the import button when the preview is right and wait for Import complete. Check the animal IDs and ear tags separately in Animals.
Open animal 403 and check that its sire is 401, whose tag is MO-401. Check the three genotype results, the MO-C1 and MO-C2 cage records, and the line against your file.
What carries over
- EID supplies Animal ID and Physical Tag supplies Ear tag when both columns are present.
- Sex and Date of Birth keep their values; Cage Tag supplies the cage number and Strain supplies the line.
- Genotypes values such as ExampleGene^fl/+ keep the gene and both alleles.
- Sire supplies a father reference when a matching animal is available. This animal-list format does not automatically map a dam.
Check the result
The fictional sample adds 9 records, including three living animals with separate IDs and ear tags. Animal 403 retains its sire link through the parent's physical tag.
Undo an import
Choose Undo import on the completion screen, or return to Import and find the batch in the last 24 hours. Undo removes the records that batch added and restores values it changed when those records can still be put back.
Read the Undo result. Records edited or used since the import may be kept. Correct a copy of your source file, check the preview again, and import only when the result is right.